CADERIGE/CADIXE
Main Principles
Overall structure of the User Interface
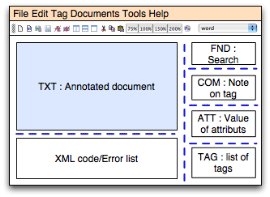
Besides the classical Menu bar and the Toolbar containing icons of the most common functions, the main window of the application is separated in several zones that can be resized by using the separations bar :
- TXT : original document being annotated (upper left)
- XML : XML tags introduced in the text (lower left)
- FND : search tool to find a fragment of text or a specific tag
- COM : comment tool allowing to associate a note to the current tag
- ATT : value of the XML attributes of the current tag
- TAG : list of available tags from the current context

Display of the following areas TOOLBAR, ATT, TAG, FND and COM can be switched on/off with the commands occurring in the menu TOOLS. Moreover the relative position of the four tools at the right can be modified (cf “Preferences setting”).
Text annotation process using CADIXE editor
The annotation process mainly includes three different steps :
- First, the user selects with the mouse the chunk of text (words, paragraph) to annotate, by default the selection is automatically extended to the beginning/ending of the next/previous words (cf. “preference setting” to change this behavior).
- Then he/she applies an annotation tag on this chunk by clicking on the corresponding tag in the right side of the window. The corresponding chunk of text will then appear by using the display format associated with the tag in the current style sheet. Moreover, the new tag appears in the XML area in the lower part of the editor.
- Finally, the user enters the values of the tag’s attributes (if any) in the ATT area.
The “current tag” is always defined by the cursor position. Thus, to check a specific annotation, the end-user only needs to click on the relevant chunk of text. Tag name, list of attributes and their values automatically appears in the ATT area of annotation editor. These values can be modified by the end-user at any moment. If values have been defined in the DTD by an enumerated list, they can be directly chosen from a menu. Otherwise, a text field is provided to enter the value.
The list of available tags (TAG area) is dynamically modified according to the position of the cursor in the text. Only tags that are (according to the DTD) more specific than the current tag AND more general that the tags occurring in the selected area can be used. Other tags are either greyed or made invisible (cf. “preferences settings”). This behaviour has been defined to avoid tagging errors and to guide the end-user in the annotation process. When a new tag is inserted, a dialog box optionally appears (cf “preferences settings”) to enter values of the different attributes. Clicking on the “Cancel” button stops the current insertion process. The REQUIRED attributes are written in red.
The XML part of the main window shows the list of all the tags inserted within the document. To each tag is associated four information : the positions of the first and last character of the tag, the fact there is a comment associated with this tag (the color of the icon expressing the comment status) and finally the fact there is a validation error associated to this tag (cf. menu TOOLS). The navigation between the annotated document and the XML part is fully synchronized, that is to say that clicking on one area automatically position the other area to the corresponding text chunk
Modifying a text and its annotations
As in a classical editor, the end-user is free to insert, delete or copy-and-paste text in a document. To delete an annotation tag, the user must put the cursor on the corresponding text area and select the command “Delete current tag” in menu TAG. To suppress all the annotations in an area, the user must apply the command “Delete tag group”. In that case, after a confirmation query, the current tag will be deleted, together with all the subsequent tags (XML sub-tree).
When the user selects a chunk of text then hits the key “Suppr” (or “Delete”) the character are deleted and the associated annotations are deleted. However, to avoid the erroneous keystrokes, the editor asks for a validation when the delete zone contains more than one annotation (as with the command “Delete tag group”).
In some cases, due to the DTD structure, several different tags can be applied on the same chunk of text (same start and stop position). In such a case, to select the relevant tag, it is possible to click on the corresponding tag in the XML zone.
How to write a DTD
Annotation of text documents is done through a “tag set” whose “grammar” is defined in an external, domain specific, DTD (Document Type Definition). Below are two websites (among many others) concerning XML and explaining the way to write a DTD :
- XML description : http://www.brics.dk/~amoeller/XML/overview.html
- How to write a DTD : http://www.w3schools.com/dtd/dtd_intro.asp
How to write a style sheet
The style sheets used by CADIXE to display the tags, are based on the classical CSS format (Cascading Style Sheets) that must be written out of the editor. To create or to edit CSS files the user can either used a text editor or, far better, to use a specific CSS editor. Freeware and shareware versions of such applications exist for all the OS (Linux, MacOs X, Windows), here are some of them :
- Multi-OS:
- Linux :
- MacOs X :
By default, styles sheets are placed in the directory “formats/styles”. Here is the list of the CSS attributes that are understood by CADIXE. Other attributes are currently ignored but we hope to decrease these restrictions in the next releases. Here is a (real) example of display :
![]()
Hereunder is the list of the attribute handled by CADIXE. Specific attributes of the editor (not in the CSS 2.0 reference) begin with the prefix “cadixe-” :
Standard attributes to set fonts and colors :
- background-color : color ;
- color : color ;
- font-family : font name ;
- font-style: italic ;
- font-size : number ;
- font-weight : bold;
- text-decoration : {underline, line-through} ;
Attributes to draw a “box” around tags :
- border-color : color ;
- border-width : number ;
- border-style : {solid, dotted, dashed} ;
- cadixe-border-shape : {rectangle} ;
Attributes to declare “parametric styles” (see chapter “Special Features”):
- cadixe-index-attribute : attribut1, attribut2, … ;
Attributes to chose the icon of an “EMPTY” tag (see chapter “Special Features”):
- cadixe-empty-tag : path ; - Relative path to a GIF picture (~ 12pt), the root folder is (momentarily!!) the folder “resources/icons”.